Accessing your Files Using the Web Interface
You can access your ownCloud files from anywhere using the ownCloud web interface. Once accessed, using the Files app you can view (if a common type), move, rename, download, share, and delete your files easily.
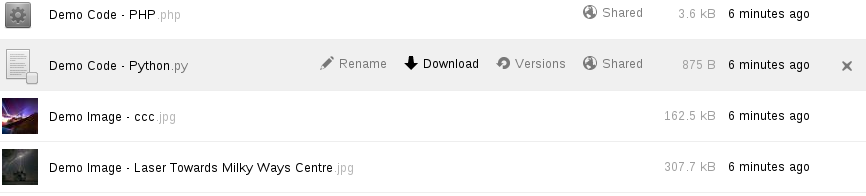
ownCloud web interface Files app
ownCloud version 7 enables you to see file thumbnails next to the filenames. Hovering over a file or folder provides the following highlighted list of operations:
- Rename – Enables you to rename a file or folder.
- Download – Downloads a file to your system.
- Versions (when enabled; See Version Control for details) – Enables you to revert the file or folder to any available older versions.
- Share – Enables you to share the file or folder with a group or a specific user. Also enables you to share using a specified link.
- Edit – When a file is editable, enables you to open the file in the document application as long as that application is enabled for use from the ownCloud server.
- Delete – Deletes the selected file or folder.
Navigating Inside Your ownCloud
Navigating through folders in ownCloud is as simple as clicking on a folder to open it and using the back button on your browser to move to a previous level. For added convenience, ownCloud also provides a navigation bar at the top of the Files field for quick navigation.
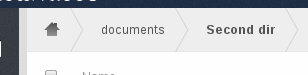
Navigation bar
The navigation bar functions as a “breadcrumb” locator. It indicates your current directory and enables you to migrate back to one of the upper directories or, using the home icon, to navigate back into your root folder.
Creating or Uploading Files and Directories
ownCloud enables you to create new files or folders directly in an ownCloud folder by clicking on the New button in the Files app.

New button options
The New button provides the following three options from which to choose:
- Text file – Creates a simple text file and adds the file to the current folder in your ownCloud.
- Folder – Creates a new folder in the current folder.
- From link – Downloads a file from a provided link path and places it into the current folder.
Selecting Files or Folders
You can select one or more files or folders by clicking on the small thumbnails or icons that represent them. When you select a file or folder, a small checkbox is populated with a check to indicate that it is selected. To select all files in the current directory, you can click on the checkbox located at the top of the Files app field, above the first file or folder on the list.
If you select multiple files, you can deleted all of the selected files or download them as a ZIP file by using the Delete or Download buttons at the top right side of the Files app field.
Note
If the Download button is not visible, the administrator has disabled this feature. Contact your administrator for further guidance.
Filtering the File Application View
ownCloud enables you to view files in the File Application View using filter options located in the Apps Information Field. This feature enables you to quickly and easily view and manage files based on their share status.
You can click on any of the filter options to view the files as follows:
- All files – The default view; displays all files in the Application View window.
- Shared with you – Displays all files shared with you by another user or group.
- Shared with others – Displays all files that you have shared with other users or groups.
- Shared by link – Displays all files that are shared by you through the use of a link.
Previewing Files
You can display uncompressed text files, OpenDocument files, PDFs, and image files from the ownCloud server by clicking on the file name. If ownCloud cannot display a file, a download process starts and the file is downloaded to your system.
Moving Files
Using the ownCloud web interface, you can move files and folders by dragging and dropping them into any directory. If you want to move a file or folder to an upper directory, click and drag them to one of the folders shown in the navigation bar.
Sharing Files
- When enabled by the administrator, you can share any file or folder on ownCloud
- with a local user, group, or any person online with a public link. By sharing a file or folder, the user or group can download the information directly to their system. Shared files and folders depict a globe icon and the status Shared in the file or folder row.
To share a file or folder:
- Using your cursor, hover over an item in the Files Application View.
- Locate the Share icon in the file or folder row.
- Click Share.
The Share dialog box opens to show the following options:
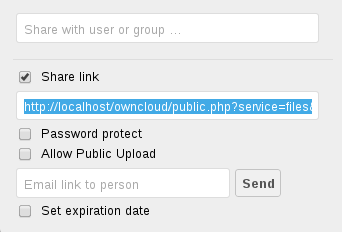
Share dialog box
- Choose the desired share option:
User/Group Share field: Enables you to specify to whom you want to share the file or folder. Once you specify a user or group, a dialog appears providing added sharing options.
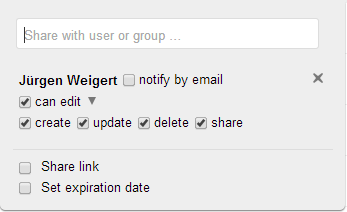
Sharing options dialog
Share link checkbox: When enabled (checked), provides the following additional share options:
File/Folder URL field: Specifies the URL to the folder or file that you want to share.
Password Protect checkbox: When enabled (checked), provides the option of protecting access to the file of folder through the use of a simple alphanumeric password.
Allow Public Upload checkbox: When enabled (checked), provides the ability for shared users to upload files using the provided link.
Email Link field: Enables you to alert users of the shared folder by email. You can specify one or more email addresses in this field (separated by spaces) and then click the “Send” button to send emails of the share.
Note
The server must be configured with a mail server or mail server access.
Set expiration date checkbox: When enabled (checked), you can specify a date for which the share expires. You specify the expiration date in the format MM/DD/YYYY. For added convenience, clicking in the “Expiration date” field opens a calendar from which you can specify the date.
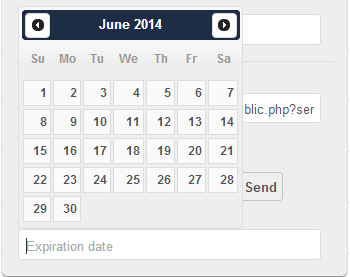
Expiration Date Calendar